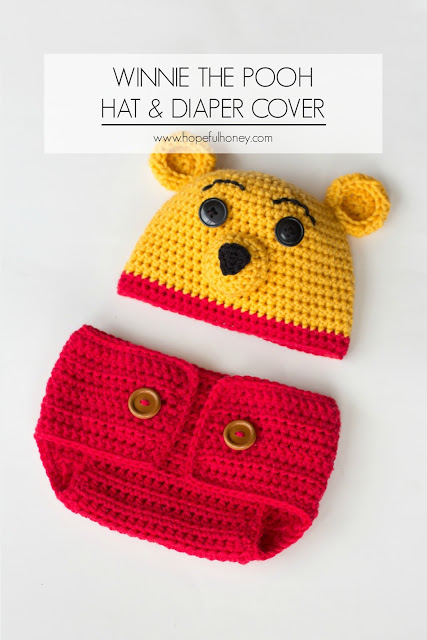
Winnie The Pooh Inspired Hat & Diaper Cover – Free Crochet Pattern
Every single time I spot a familiar yellow bear I can’t help but start humming his iconic song which goes a little something like this… “Winnie the pooh, chubby little cubby all stuffed with fluff, he’s winnie the pooh!”
Ahhh, doesn’t that bring back some wonderful childhood memories?
If you’d like to continue getting in touch with your childhood maybe try crocheting a Mickey Mouse set or a hungry Cookie Monster hat!
What You’ll Need
5.00mm Crochet Hook
Aran Yarn {10ply} – I used Patons Merino Extrafine Aran (Canary, Cherry, Black)
Tapestry/Wool Needle
2x Buttons 3/4″ in size
Aran Yarn {10ply} – I used Patons Merino Extrafine Aran (Canary, Cherry, Black)
Tapestry/Wool Needle
2x Buttons 3/4″ in size
Size Available
Newborn, 0 – 3 Months Old
Head Circumference 13.5 inches, 34cm. Hat Height 5.5 inches, 14cm
3 – 6 Months Old
{Head Circumference 15 inches, 38cm. Hat Height 6 inches, 15cm}
Gauge
7 Stitches & 6 Rows in Half Double Crochet = 2 Inches
Stitches & Abbreviations
st(s) – stitch(es)
ch – chain stitch
sc – single crochet
hdc – half double crochet
dc – double crochet
hdc2tog – half double crochet 2 together/decrease
sl st – slip stitch
Hat
Rnd 1- Taking your 5.00mm crochet hook and yarn (canary), start of by making a Slip Knot, then Ch2. 8 hdc in 2nd ch from hook. Join with sl st in first hdc. (8 sts)
Rnd 2- Ch1, 2 hdc in every st, all around. Join with sl st in first hdc. (16 sts)
Rnd 3- Ch1, 2 hdc in the 1st st. *1 hdc in next st. 2 hdc in the next st. Repeat from the * all around. Join with sl st in first hdc. (24 sts)
Rnd 4- Ch1, 2 hdc in the 1st st. *1 hdc in next 2 sts. 2 hdc in the next st. Repeat from the * all around. Join with sl st in first hdc. (32 sts)
Rnd 5- Ch1, 2 hdc in the 1st st. *1 hdc in next 3 sts. 2 hdc in the next st. Repeat from the * all around. Join with sl st in first hdc. (40 sts)
Rnd 6- Ch1, 2 hdc in the 1st st. *1 hdc in next 4 sts. 2 hdc in the next st. Repeat from the * all around. Join with sl st in first hdc. (40 sts)
Rnd 7- (Skip this round if you’re crocheting the newborn size.) Ch1, 2 hdc in the 1st st. *1 hdc in next 5 sts. 2 hdc in the next st. Repeat from the * all around. Join with sl st in first hdc. (56 sts)
Rnd 8 – 18- Ch1, 1 hdc in every st all around. Join with sl st in first hdc. (56 sts) (Skip two rounds if you’re crocheting the newborn size.)
Rnd 19– Change yarn colour (cherry). Ch1, 1 hdc in every st all around. Join with sl st in first hdc.
Rnd 20– Ch1, 1 hdc in every st all around. Join with sl st in first hdc.
Fasten off, and weave in loose ends.
Fasten off, and weave in loose ends.
Ears
Rnd 1- Taking your 5.00mm crochet hook and yarn (canary), start of by making a Slip Knot, then Ch2. 8 hdc in 2nd ch from hook. Join with sl st in first hdc. (8 sts)
Rnd 2- Ch1, 2 hdc in every st, all around. Join with sl st in first hdc. (16 sts)
Rnd 3- Ch1. *1 hdc in next st, 2 hdc in next st. Repeat from the * all around. Join with sl st in first hdc. (24 sts)
Rnd 4- Ch1. *1 hdc in next stitch. 1 hdc2tog. Repeat from the * all around. Join with sl st in first hdc.
Fasten off, and weave in loose ends.
Make a pair. Taking your tapestry needle, sew both ears to the top of your hat, making sure they’re evenly spaced out.
Nose
Rnd 1- Taking your 5.00mm crochet hook and yarn (canary), start of by making a Slip Knot, then Ch2. 8 hdc in 2nd ch from hook. Join with sl st in first hdc. (8 sts)
Rnd 2- Ch1, 2 hdc in every st, all around. Join with sl st in first hdc. (16 sts)
Rnd 3- Ch1. *1 hdc in next 3 sts, 2 hdc in next st. Repeat from the * all around. Join with sl st in first hdc. (20 sts)
Rnd 4- Ch1, 1 hdc in every st, all around. Join with sl st in first hdc.
Fasten off, and weave in loose ends.
Taking your tapestry needle, sew the nose onto the front of your hat, beneath the ears and eyes.
Black Part
Row 1- Taking your 5.00mm crochet hook and yarn (black), start of by making a Slip Knot, then Ch2. 2 hdc in 2nd ch from hook. (2 sts)
Row 2– Ch 1, 2 hdc in next 2 sts. (4 sts)
Fasten off, and weave in loose ends.
Sew the black part of the nose onto the yellow part of the nose.
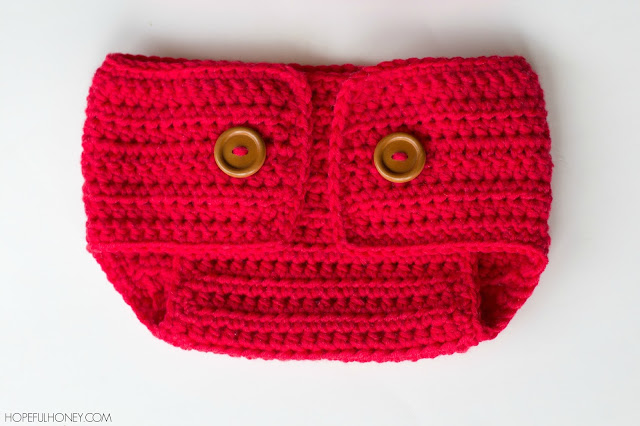
Diaper Cover
Newborn Size (13″ waist):
Row 1- Taking your 5.00mm crochet hook and yarn (cherry), start of by making a Slip Knot, then Ch51. 1 hdc in 2nd ch from hook. 1 hdc in next 49 ch. (50 sts)
Row 2 – 3- Ch1, 1 hdc in same st. 1 hdc in next 49 sts.
Row 4– Ch2, 1 dc in same st. 1dc in next 49 sts.
Row 5 – 7– Ch1, 1 hdc in same st. 1 hdc in next 59 sts.
Row 8– Sl st in next 11 sts. Sl st in next st, ch 1, hdc2tog. 1 hdc in next 22 sts. Hdc2tog, turn your work. (24 sts)
Row 8– Sl st in next 11 sts. Sl st in next st, ch 1, hdc2tog. 1 hdc in next 22 sts. Hdc2tog, turn your work. (24 sts)
Row 9– Ch1, hdc2tog. 1 hdc in next 20 stitches, hdc2tog. (22 sts)
Row 10– Ch1, hdc2tog. 1 hdc in next 18 stitches, hdc2tog. (20 sts)
Row 11– Ch1, hdc2tog. 1 hdc in next 16 stitches, hdc2tog. (18 sts)
Row 12– Ch1, hdc2tog. 1 hdc in next 14 stitches, hdc2tog. (16 sts)
Row 12– Ch1, hdc2tog. 1 hdc in next 14 stitches, hdc2tog. (16 sts)
Row 13-28– Ch1, 1 hdc in next 16 sts.
Fasten off, and weave in loose ends.
3 – 6 Month Old Size (16″ waist):
Row 1- Taking your 5.00mm crochet hook and yarn (cherry), start of by making a Slip Knot, then Ch61. 1 sc in 2nd ch from hook. 1 sc in next 59 ch. (60 sts)
Row 2 – 4- Ch1, 1 hdc in same st. 1 hdc in next 59 sts.
Row 5– Ch2, 1 dc in same st. 1dc in next 59 sts.
Row 6 – 8– Ch1, 1 hdc in same st. 1 hdc in next 59 sts.
Row 9– Ch1, 1 sc in same st. 1 sc in next 59 sts.
Row 10– Sl st in next 14 sts. Sl st in next st, ch 1, hdc2tog. 1 hdc in next 28 sts. Hdc2tog, turn your work. (30 sts)
Row 9– Ch1, 1 sc in same st. 1 sc in next 59 sts.
Row 10– Sl st in next 14 sts. Sl st in next st, ch 1, hdc2tog. 1 hdc in next 28 sts. Hdc2tog, turn your work. (30 sts)
Row 11– Ch1, hdc2tog. 1 hdc in next 26 stitches, hdc2tog. (28 sts)
Row 12– Ch1, hdc2tog. 1 hdc in next 24 stitches, hdc2tog. (26 sts)
Row 13– Ch1, hdc2tog. 1 hdc in next 22 stitches, hdc2tog. (24 sts)
Row 14– Ch1, hdc2tog. 1 hdc in next 20 stitches, hdc2tog. (22 sts)
Row 15– Ch1, hdc2tog. 1 hdc in next 18 stitches, hdc2tog. (20 sts)
Row 16– Ch1, hdc2tog. 1 hdc in next 16 stitches, hdc2tog. (18 sts)
Row 14– Ch1, hdc2tog. 1 hdc in next 20 stitches, hdc2tog. (22 sts)
Row 15– Ch1, hdc2tog. 1 hdc in next 18 stitches, hdc2tog. (20 sts)
Row 16– Ch1, hdc2tog. 1 hdc in next 16 stitches, hdc2tog. (18 sts)
Row 17-31– Ch1, 1 hdc in next 18 sts.
Fasten off, and weave in loose ends.
Taking your 5.00mm crochet hook and yarn (cherry), start of by making a Slip Knot, then attach your yarn to the back of the diaper cover, right in the middle. Sc all along the edge of your diaper cover. Sl st in 1st sc.
Fasten off, and weave in loose ends.
Hope you all enjoyed this Disney inspired pattern!
If you did crochet this, please post a photo of your creation onto my Facebook Page.
I’d love to see it!
Have a lovely day crocheting,


Oh Winnie the Pooh!! A favorite and this set is just adorable. Thank you so much.
Made Winnie the Pooh &a basket for my Great Grandson to be (early April )
The nursery is Winnie the Pooh
OH MY GOODNESS! I have to crochet this and the MICKEY MOUSE for my 4 month old grandson! THANKS SO MUCH!
poohriffic
i love to see how to make this i am very new to this
This pattern is precious. Thank you for sharing the pattern and your talent.
This pattern is precious. Thank you for sharing the pattern and your talent.
Thanx for sharing olivia. Very nice ..i'll try to make this for my newbornbaby <3
This is adorable!! Thank you for sharing. I am having trouble locating 10ply yarn in these colours near me. Would 8 ply be ok?
How do I print this pattern
Unable to print pattern – please advise. Love the pattern.
Thanks
Oh my goodness i love this pattern Please tell me that you do videos to i would love to see this done in one !
I was wanting to do this, as I started the diaper cover I noticed a mistake…in row 4 it shows 49 sts then in row 5 it says 59 st. How the heck do you get 59 out of 49? Do I need to add some sts to row 4? Row 4- Ch2, 1 dc in same st. 1dc in next 49 sts.
Row 5 – 7- Ch1, 1 hdc in same st. 1 hdc in next 59 sts.
Row 8- Sl st in next 11 sts. Sl st in next st, ch 1, hdc2tog. 1 hdc in next 22 sts. Hdc2tog, turn your work. (24 sts)
I to want to know how that is
I think it is a typo. When looking at the picture of the diaper I don't think it goes out that far. Pretty straight. But first time doing this pattern.
Hi and thank you for this pattern, one question please…does the diaper pull up only, are the buttons just to fasten the flaps together?
Bonjour, Lovely, Can i put the link, and also a photo on my blog ?
Did anyone ever get an answer to Nancy's question about going from 49- 59 stitches in one row?
It doesn't show you increasing in row 4.
I wanted to make this for a shower gift by week 3 of August.
Did the directions ever explain how to close the diaper cover? I see the two buttons in the photo but could not find instructions on how to attach them and did not see button holes worked into the pattern.
I didn’t see how to attach the diaper cover either. Any ideas?
Thank you so much for sharing. I've always loved Pooh too. My oldest book is from 1961, I loved reading it to my kids. My youngest sons baby theme was all Pooh stuff and had this been around back then he certainly would have been wearing it. But I will be ready for any grands that come along now. 🙂
Rnd 6- Ch1, 2 hdc in the 1st st. *1 hdc in next 4 sts. 2 hdc in the next st. Repeat from the * all around. Join with sl st in first hdc. (40 sts)
I belive that should be 48 st. because round 5 has 40 st.
I agree, Dianna. I believe this is a Errata in the Pooh Hat Pattern; when I completed Rnd 6, I counted 48 sts from this increase Rnd.
Yes I think that too.
What do you mean by half double crochet in same stitch? Please explain.
Wow thanks for sharing. I love Pooh gonna make this for sure..!
This is a perfect Winnie the Pooh set!! I had never heard of Winnie the Pooh until I was well into my 20s. (Can you believe it??!!) Thanks so much for sharing this with us. I have a new cousin (I'm 66 and he's 2 weeks.) I think I might try out your pattern for him.
If you have the winnie the pooh diaper cover set. I would love to make this for my great grand son. You send it to my e-mail. judywlarry63@yahoo .com
What terms is this written in? I use US terms and doing hdc makes the hat really long and weird looking.
Trop beau et facile a crocheter
is it possible to get this in a 8 ply
cannot get the patterns for some reason?
Help!!!
Row 9– Ch1, 1 sc in same st. 1 sc in next 59 sts.
Row 10– Sl st in next 14 sts. Sl st in next st, ch 1, hdc2tog. 1 hdc in next 28 sts. Hdc2tog, turn your work. (30 sts)
I’m confused Row 9 has 60 single crochets, how fo I go from 60 stitches to 30 stitches in Row 10?
Thanks
Would love to crochet the “Winnie The Pooh Inspired Hat & Diaper Cover” for my younger brother’s little baby girl. How do I obtain the free pattern?
I have an answer to the question about row 10. In the diaper cover for the newborn. If you compare it to the 3 month size you will see that there is a error in the newborn size. You were never supposed to have 59 stitches. Only 49. Does this make sense?
Just finished the Winnie Pooh items for a friend’s second grand baby due in a week.
Thank you Olivia for sharing free your pattern.
I will try to make it for my first ever grandchild, will born in August from my only longtime estranged daugther. If I am successful, I will send you my photo. Please, keep safe and remain kind in this arsh world.
Love the pattern thank you, I made my own buttons…( not sure how to share a photo)
For the first cover, just bring the bottom to the top and see buttons on. Row 4 (The dc row) is where you will use as button holes, so it can be adjustable.
Darn auto incorrect!!
For the diaper cover, just bring the bottom to the top and sew buttons on. Row 4 (The dc row) you will use as button holes, so it can be adjustable.
Hi, I am super confused by rows 9 and 10. How does it go from having 59 stitches to 30?
Still no one has answered this question!!!!
Literally going to stop making the diaper and just keep the hat!
Literally going to stop making the diaper and just keep the hat!
Figured it out… on row 10 the first 14 sl sts are not counted as sts. The count starts from hdc2tog to the other hdc2tog. And you don’t work the last remaining sts. The 30 sts are the sts between the two hdc2tog
My Granddaughter wanted Winnie the Pooh for her newborn son’s1 month mark.Now for his 2nd month mark she wants Mickey Mouse. Then Olaf , a different Disney Character every month for one year. I AM GOING TO BE BUSY, plus making hats for my grandkids