• Skip to primary navigation
  • Skip to footer navigation
  • Skip to content
Display Search Bar
Follow Hopeful Honey on Facebook! Follow Hopeful Honey on Twitter! Follow Hopeful Honey on Pinterest! Follow Hopeful Honey on Instagram! Follow Hopeful Honey on YouTube!

Hopeful Honey

Craft, Crochet, Create

  • Home
  • About
  • Patterns
    • Women
      • Cowls + Scarves
      • Free Patterns
      • Hats + Headbands
      • Ponchos + Ruanas
      • Sweaters + Cardigans
      • Wraps + Shawls
      • View All
    • Home
      • Baskets
      • Blankets + Throws
      • Free Patterns
      • Holiday Themed
      • Home Accessories
      • View All
    • Children
      • Animal Themed
      • Cowls + Scarves
      • Free Patterns
      • Hats + Headbands
      • Sweaters + Cardigans
      • View All
    • Baby
      • Animal Themed
      • Booties + Sandals
      • Free Patterns
      • Hats + Headbands
      • Sweaters + Cardigans
      • View All
  • Tutorials
    • Basic Crochet StitchesUS Terms
    • Basic Crochet StitchesUK Terms
    • Crochet Stitchionary & Techniques
  • Shop
  • Contact
    • My Contact Info
    • Advertising Info
    • Site Policies

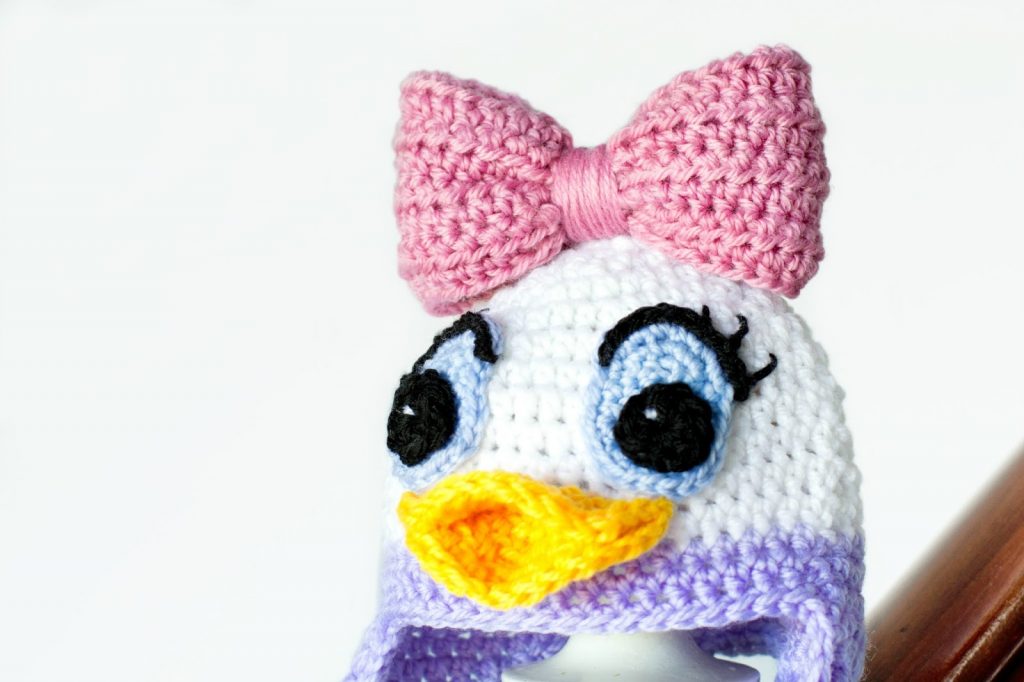
Daisy Duck Inspired Baby Hat Crochet Pattern

February 21, 2014 Category: Baby / Crochet / Hats + Headbands / Patterns

Share Share on Facebook Share on Twitter
38
It’s been quite a while, but I think it’s about time for a heart to heart…
As many of my regular readers would know, last year held many challenges for me emotionally as I physically tried cope with the tedious business of recovering from major surgery, and two long months in hospital. Thankfully though, surgery went really well, and I’m feeling like my old self!
So, with the awesome knowledge that I now have more energy again, I decided to challenge myself at the beginning of this year by trying my very best to post two crafty blogposts a week, and so far I’ve stuck to my New Years resolution!
I’ve also been working hard at trying to create more unique crochet patterns, improve my photography through online courses, as well as better my blogs overall blog-iness. 
Somehow, I’ve also managed to push outside my comfort zone, and I’ve written up two guest blogposts! One of them was recently published, and I can’t begin to describe the wave of happiness and pride that washed right over me when I saw my work displayed on another site!
It’s been a fun, yet busy journey thus far, but I can’t wait for a year full of learning and amazing opportunities!
What have you been up to so far this year? Tell me in the comments!.. After all, we’re friends!

What You’ll Need

6.00mm Crochet Hook
5.00mm Crochet Hook 
  440yds DK (8ply) Yarn – Stylecraft Special DK
Tapestry Needle

Finished Size
3 – 6 Months Old
{Head Circumference 16 inches, 40cm. Hat Height 6.5 inches, 16.5cm}

~ Note ~
{Chains at the start of a round count as the first Half Double Crochet of that round}

Round 1~ Taking your 6.00mm crochet hook and white yarn, start of by making a Slip Knot, then crochet 2 Chains. Crochet 7 Half Double Crochets into the first chain you made. Slip Stitch into the top of chain 2. You should have 8 half double crochets now.
Round 2~ Chain 2, then crochet a Half Double Crochet into the same stitch. Crochet 2 Half Double Crochets into every stitch all around. Slip Stitch into the top of chain 2. You should have 16 half double crochets now. 
Round 3~ Chain 2, then crochet a Half Double Crochet into the same stitch. *Crochet 1 Half Double Crochet. Then crochet 2 Half Double Crochets in the next stitch. Repeat from the * all around. Slip Stitch into the top of chain 2. You should have 24 half double crochets now.
Round 4~ Chain 2, then crochet a Half Double Crochet into the same stitch. *Crochet 1 Half Double Crochet into the next 2 stitches. Then crochet 2 Half Double Crochets in the next stitch. Repeat from the * all around. Slip Stitch into the top of chain 2. You should have 32 half double crochets now.
Round 5~ Chain 2, then crochet a Half Double Crochet into the same stitch. *Crochet 1 Half Double Crochet into the next 3 stitches. Then crochet 2 Half Double Crochets in the next stitch. Repeat from the * all around. Slip Stitch into the top of chain 2. You should have 40 half double crochets now.
Round 6~ Chain 2,
then crochet a Half Double Crochet into the same stitch. *Crochet 1 Half Double Crochet into the next 2 stitches. Then crochet 2 Half Double Crochets in the next stitch. Repeat from the * all around. Slip Stitch into the top of chain 2. You should have 53 half double crochets now.

Round 7 – 12~ Chain 2. Crochet 1 Half Double Crochet into every stitch all around. Slip Stitch into the top of chain 2.
Round 13 – 14~ Change yarn colour to purple. Chain 2. Crochet 1 Half Double Crochet into every stitch all around. Slip Stitch into the top of chain 2.
Round 15~ Chain 2. Crochet 1 Half Double Crochet only into the next 35 stitches. {Note: This is starting to create the back of the hat as well as the ear-flaps.}
Round 16~ Chain 2. Crochet 1 Half Double Crochet into the next 35 stitches. Do NOT fasten off, as you will be crocheting the left ear-flap in the same place.

~ Ear Flaps ~

Left Ear-Flap
Round 1~ Chain 1. Crochet 1 Half Double Crochet Decrease. Crochet 1 Half Double Crochet into the next 6 stitches. Then crochet 1 Half Double Crochet Decrease.
Round 2~ Chain 1. Crochet 1 Half Double Crochet Decrease. Crochet 1 Half Double Crochet into the next 4 stitches. Then crochet 1 Half Double Crochet Decrease.
Round 3~ Chain 1. Crochet 1 Half Double Crochet Decrease. Crochet 1 Half Double Crochet into the next 2 stitches. Then crochet 1 Half Double Crochet Decrease.
Round 4~ Chain 1. Crochet 2 Half Double Crochet Decreases.
Fasten off, and weave in loose ends.

Right Ear-Flap
Start of by attaching your purple yarn to the last stitch of Row 16.
Right across from where the left ear-flap is.
Round 1~ Chain 1. Crochet 1 Half Double Crochet Decrease. Crochet 1 Half Double Crochet into the next 6 stitches. Then crochet 1 Half Double Crochet Decrease.
Round 2~ Chain 1. Crochet 1 Half Double Crochet Decrease. Crochet 1 Half Double Crochet into the next 4 stitches. Then crochet 1 Half Double Crochet Decrease.
Round 3~ Chain 1. Crochet 1 Half Double Crochet Decrease. Crochet 1 Half Double Crochet into the next 2 stitches. Then crochet 1 Half Double Crochet Decrease.
Round 4~ Chain 1. Crochet 2 Half Double Crochet Decreases.
Fasten off, and weave in loose ends.

~ Border ~

Taking your 6.00mm crochet hook and purple yarn, start of by making a Slip Knot, then attach your yarn to the back of the hat, right in the middle.
Then Single Crochet all along the edge of your hat. Slip Stitch into the first single crochet.
Fasten off, and weave in loose ends.

~ Duckbill ~

Round 1~ Taking your 6.00mm crochet hook and yellow yarn, start of by making a Slip Knot, then crochet 2 Chains. Crochet 7 Half Double Crochets into the first chain you made. Slip Stitch into the top of chain 2. You should have 8 half double crochets now.
Round 2~ Chain 2, then crochet a Half Double Crochet into the same stitch. Crochet 2 Half Double Crochets into every stitch all around. Slip Stitch into the top of chain 2. You should have 16 half double crochets now. 
Round 3~ Chain 2, then crochet a Half Double Crochet into the same stitch. *Crochet 1 Half Double Crochet. Then crochet 2 Half Double Crochets in the next stitch. Repeat from the * all around. Slip Stitch into the top of chain 2. You should have 24 half double crochets now.

Round 4~ Chain 2, then crochet a Half Double Crochet into the same stitch. *Crochet 1 Half Double Crochet into the next 2 stitches. Then crochet 2 Half Double Crochets in the next stitch. Repeat from the * all around. Slip Stitch into the top of chain 2. You should have 32 half double crochets now.
Once you’ve completed all the rounds, fold your circle in half. Then, taking your tapestry needle, sew the outer corners of the duckbill together. Then sew the duckbill to the front of your hat, right beneath the eyes.
Fasten off, and weave in ends. 


~ Eyes ~

Iris
Start of by taking your blue yarn and 5.00mm crochet hook and make a Slip Knot, then crochet 4 Chains.
Round 1~ Chain 1, then Single Crochet into the following stitch. Continue crocheting Single Crochet all across, making sure to end with 3 Single Crochet
into
the last chain. The extra 2 single crochets will turn your work around. Now you’re going to continue crocheting Single Crochet
into the bottom of the row of chains, making sure to end with 2 single
crochets in the last chain. Slip Stitch into the chain you made at the
start of this row.
Round 2~ Chain 1, then Single Crochet into the following 2 stitches. Then crochet 2 Single Crochets into the next 3 stitches. Crochet 1 Single Crochet into the following 2 stitches. Then crochet 2 Single Crochets into the next 3 stitches. {Note: Be sure to crochet only 1 Single Crochet into the stitch you chained 1 at the very beginning of the row. That chain counts as the last Single Crochet of that round.} Slip Stitch into the chain you made at the
start of this row.
Round 3~ Chain 1, then Single Crochet into the following 2 stitches. Then crochet 2 Single Crochets into the next 6 stitches. Crochet 1 Single Crochet into the following 2 stitches. Then crochet 2 Single Crochets
into the next 6 stitches. {Note: Remember, be sure to crochet only 1 Single
Crochet into the stitch you chained 1 at the very beginning of the row.
That chain counts as the last Single Crochet of that round.} Slip Stitch into the chain you made at the
start of this row.

Pupil
Round 1~ Taking your 5.00mm crochet hook and black yarn, start of by making a Slip Knot, then crochet 2 Chains. Crochet 9 Half Double Crochets into the first chain you made. Slip Stitch into the top of chain 2. You should have 10 half double crochets now. 
When
you’ve completed all the rounds, take your tapestry
needle and snow white yarn and stitch some detailing on both your eyes
pupil’s, in the upper left-hand corner.
Eyelashes
Round 1~ Taking your 5.00mm crochet hook and black yarn, start of by making a Slip Knot, then attach your yarn to the upper right hand corner of your eye. Crochet 11 Slip Stitches all along the edge of your eye. 
Repeat eye pattern once more to make a pair.
Then, taking your tapestry needle, sew both
iris’s to the front of your hat, making sure they’re evenly spaced out.
Then sew the pupils on top of the iris.

Then, taking some jet black yarn, and a tapestry needle, sew 2-3 lashes at the top of your eyes, making sure to join them to lash line you previously created.
Fasten off, and weave in ends.

~ Bow ~

Taking your 5.00mm crochet hook and pink yarn, start of by making a Slip Knot, then crochet 40 Chains.

Row 1~ Chain 2, skip 2 chains from your hook, then crochet Half Double Crochets all across into every chain.
Row 2 – 8 ~ Chain 2, half double crochet into every stitch across.
When you’ve completed all the rows, connect the two ends of the bow band together to create a circle and Slip Stitch them together.
Once you’ve slip stitched the ends together, flip the slip stitched part
to the inside and fasten your yarn off. You don’t want to trim your
yarn less than 55″/140cm because you need a long enough tail to wrap
around your bow.
Start of by slowly yet tightly wrapping the yarn around the center of
the bow. You need to wrap it around the bow at least 15 times. When
you’ve finished wrapping, knot it to the back of the bow.
Then taking your wool/tapestry needle, work the bow onto the top of your hat, right in the middle.
Fasten off, and weave in loose ends.

~ Braided Tassels ~

Taking your pink, white and purple yarn, cut 12 strands of yarn (4 of every colour), each 30 inches
long. Then make a simple knot into the bottom of the left ear-flap. Make
a loose braid as short or long as you like, (Mine was 8 inches) then
tie a knot at the end, and cut of any excess yarn.

Repeat for the right ear-flap.

~ Donald Duck Inspired Baby Hat Crochet Pattern ~

Hope you all enjoyed this Disney inspired pattern!

If you did crochet this, please post a photo of your creation onto my Facebook Page.
I’d love to see it!
Have a lovely day crocheting!

  • Glencoe Tartan Poncho Crochet Pattern
  • Florence Backpack Crochet Pattern
  • How To: Crochet The Heart Stitch - Easy Tutorial

Reader Interactions

Comments

    Leave a Note Cancel reply

  1. Diana says

    February 21, 2014 at 3:43 pm

    this is adorable

    Reply
  2. Reggie says

    March 3, 2014 at 3:43 pm

    Adorable!! Thank you!! 🙂

    Reply
  3. Unknown says

    March 14, 2014 at 5:49 pm

    Awesome!

    Reply
  4. Elaine Morgan says

    March 15, 2014 at 11:09 am

    This is adorable! I am a beginner at crochet but seem to be picking it up pretty fast. I think I am ready for a more challenging project and I would love to make this for my grand. She is six months old and a large baby. She is already several months ahead in size wearing 6-9 months easily. How should I modify the pattern for her to be able to wear it for the next six months or so?

    Reply
    • Olivia says

      March 15, 2014 at 12:04 pm

      Hello Elaine!

      Here is a link to a basic earflap hat for a 9-12 month old, that you should easily be able to adjust the colours of the rows, to look like Daisy. Then you can just make the bow, eyes, duckbill with the above pattern and sew them on.
      http://allicrafts.blogspot.com.au/2011/12/free-pattern-earflap-hat-9-12-months.html

      Hope this helps!
      Olivia

      Reply
  5. Anonymous says

    March 25, 2014 at 12:39 am

    your patterns are being sold on Listia for a profit for the sellers.

    Reply
    • Olivia says

      March 25, 2014 at 6:01 am

      I found out about this problem a week ago, and contacted Listia, but they didn't take any action.
      Thank you though, for letting me know 🙂

      Reply
  6. Crystal H says

    March 25, 2014 at 10:29 pm

    I am currently crocheting your hat, and everytime I reach round 6 I end up with 54 stitches not 53. I have done this multiple times. All the other rows have the right amount except round 6.

    Reply
    • Crystal H says

      March 25, 2014 at 11:00 pm

      Am I doing something wrong? I will start over again. I just frogged again.

      Reply
  7. Mrs. Lopez says

    March 27, 2014 at 1:36 pm

    Thank you for this pattern!

    Might I share a variation of this on my blog: lovinglifeinpink.blogspot.com? I'll link to your original post and use my own photos.

    Thanks!

    Reply
    • Crystal H says

      March 27, 2014 at 8:00 pm

      Are you coming up with the correct stitches, I keep having off stitches and Idk why. I have done this hat so many times and am going to try again.

      Reply
    • Olivia says

      March 28, 2014 at 12:05 am

      Hello,

      Yes, you may share your own photos, and include variations you made. But please do not share any other parts of my pattern.
      Thank you!

      Olivia

      Reply
  8. Laylah Rose says

    April 19, 2014 at 6:50 pm

    Hello.

    I was wondering, is it alright to sell items made from your patterns if people give you credit?

    – Thank you!

    Reply
    • Olivia says

      April 20, 2014 at 12:33 am

      Hello Laylah,
      Yes, you can sell items made from my patterns, as long as you give me credit 🙂
      Olivia

      Reply
  9. many saogm says

    July 11, 2014 at 9:09 pm

    I am stuck on row 15/16.
    I start with 53hdc…row 15 says hdc 35 this leaves 18
    row 16 says hdc another 35? suggestions?

    did i miss something?

    Reply
    • Olivia Kent says

      July 12, 2014 at 1:28 am

      Hello,
      On row 15 you're ONLY crocheting into the next 35 HDC's.
      Then you turn your work, and crochet row 16's 35 HDC's into the HDC's of row 15.
      Hope this helps!
      Olivia

      Reply
    • many saogm says

      July 13, 2014 at 8:27 pm

      OHHH Totally makes sense now!! LOL. I worked around it for this one but the next one i'll know now! 🙂 thanks so much!

      Reply
  10. melissa montford says

    October 3, 2014 at 2:54 am

    Hello, my 4yr old has asked me to make the daisy hat for her, is there any chance of bigger sizes?

    Reply
    • Olivia Kent says

      October 3, 2014 at 6:40 am

      Hello Melissa,

      You can use this crochet pattern to crochet a bigger size. It fits 4 – 10 years old –> http://www.hopefulhoney.com/2014/09/frozen-olaf-inspired-hat-crochet-pattern.html

      Reply
  11. Judy Phelps aka The Hook and "I" {:0) says

    October 15, 2014 at 6:30 am

    This little hat is just too cute to pass up making. I have been crocheting some hats for charity and I just HAVE to do this one too. Thank you so much for this adorable pattern.

    Reply
  12. Anonymous says

    October 16, 2014 at 6:32 am

    For the eyes when it says chain 4 then chain one and single crochet into the following stitch, could you expain this…I don't know if you start it right attached to your hat or if you do then and then attach. Thank you

    Reply
  13. Rena Bryce says

    November 2, 2014 at 1:23 pm

    Thank you Olivia for sharing your lovely pattern for the Daisy duck hat I just love it I have done one of them and now about to start another one they are truly beautiful I ;you so beautiful work well done
    Rena

    Reply
  14. Anonymous says

    September 9, 2015 at 11:55 pm

    Olivia, I loved making the Daisy hat! So much fun & too cute! I plan to make more, thanks so much!

    Reply
  15. Les says

    October 2, 2015 at 10:13 am

    Hi, I'm making my niece some hats as she's having chemo and loosing her hair. As she has small children she wants funky hats and yours are super!! I'm going to have to adapt them for DK Cotton as she lives in Australia and it's coming up summer there and also adult. Are your patterns in UK terms or USA?

    Reply
    • Olivia Kent says

      October 4, 2015 at 3:12 am

      What a wonderful thing to do Les!
      All my patterns are written using US terms, as that's how I learned to crochet.
      Hope this helps!
      Olivia

      Reply
  16. ankita says

    December 14, 2017 at 7:09 pm

    its really nice i like it

    Reply
  17. parul says

    December 14, 2017 at 7:12 pm

    its great really i like it

    Reply
  18. Cheryl says

    January 3, 2018 at 7:33 am

    Do you have this pattern Daisey duck in 18 to 24 months?

    Reply
  19. cheryl says

    January 4, 2018 at 1:30 pm

    can you please send a link to size 18 to 24 months for this pattern? it is so adorable and i would love to make for my granddaughter. thank you.

    Reply
  20. Kristin says

    April 11, 2018 at 4:19 am

    Do you have a pattern for any other size other than 3-6 months? They are so cute. My sister is having a Disney themed wedding. The flower girl is Daisy Duck and the ring barrier is Donald Duck. Like literally dressing the them. I wanted to make these as gifts for them.

    Reply
  21. Doreen says

    April 11, 2018 at 5:56 am

    Such cute ideas. Just found your site by accident! Love the free patterns. Read your bit about last year. Sounds like you have overcome a lot and are achieving new goals. You give me inspiration.

    Reply
  22. Sue says

    December 4, 2018 at 2:17 am

    This is gorgeous! I’m a beginner but I’m going to have a go for my little granddaughter and if all goes well I can make it again for my nxt granddaughter when she arrives. Fingers crossed I will try my best! I love all of the patterns you post and I’m so glad you are feeling more like yourself. All the best

    Reply
  23. Caroline says

    October 31, 2019 at 5:00 am

    Can I use an adult pattern for hat and then add the eyes etc

    Reply
  24. Lisette says

    December 6, 2019 at 8:41 pm

    Is there a link to adjust the pattern for an adult size? My sister would LOVE this hat.

    Reply
  25. Valerie Robinson says

    January 20, 2021 at 8:17 am

    Donald looks amazing

    Reply
  26. Pamela says

    February 28, 2021 at 4:35 am

    como puedo hacer el gorro para una niña de 4 a 6 años por favor

    Reply
  27. Jeanette L Walker says

    December 13, 2021 at 9:58 am

    Can you please tell me how to get your free patterns?

    Reply
  28. Jeanette Walker says

    July 13, 2022 at 2:16 pm

    I love your Donald and daisy Hats are so darn cute. Any way you can tell how I can retrieve your free patterns??

    Reply

Follow Along on Instagram @HopefulHoney

Copyright © Hopeful Honey Olivia Kent 2025
  • Policies
  • Contact
Follow Hopeful Honey on Facebook! Follow Hopeful Honey on Twitter! Follow Hopeful Honey on Pinterest! Follow Hopeful Honey on Instagram! Follow Hopeful Honey on YouTube!
Designed by Melissa Rose Design Developed by Once Coupled