• Skip to primary navigation
  • Skip to footer navigation
  • Skip to content
Display Search Bar
Follow Hopeful Honey on Facebook! Follow Hopeful Honey on Twitter! Follow Hopeful Honey on Pinterest! Follow Hopeful Honey on Instagram! Follow Hopeful Honey on YouTube!

Hopeful Honey

Craft, Crochet, Create

  • Home
  • About
  • Patterns
    • Women
      • Cowls + Scarves
      • Free Patterns
      • Hats + Headbands
      • Ponchos + Ruanas
      • Sweaters + Cardigans
      • Wraps + Shawls
      • View All
    • Home
      • Baskets
      • Blankets + Throws
      • Free Patterns
      • Holiday Themed
      • Home Accessories
      • View All
    • Children
      • Animal Themed
      • Cowls + Scarves
      • Free Patterns
      • Hats + Headbands
      • Sweaters + Cardigans
      • View All
    • Baby
      • Animal Themed
      • Booties + Sandals
      • Free Patterns
      • Hats + Headbands
      • Sweaters + Cardigans
      • View All
  • Tutorials
    • Basic Crochet StitchesUS Terms
    • Basic Crochet StitchesUK Terms
    • Crochet Stitchionary & Techniques
  • Shop
  • Contact
    • My Contact Info
    • Advertising Info
    • Site Policies

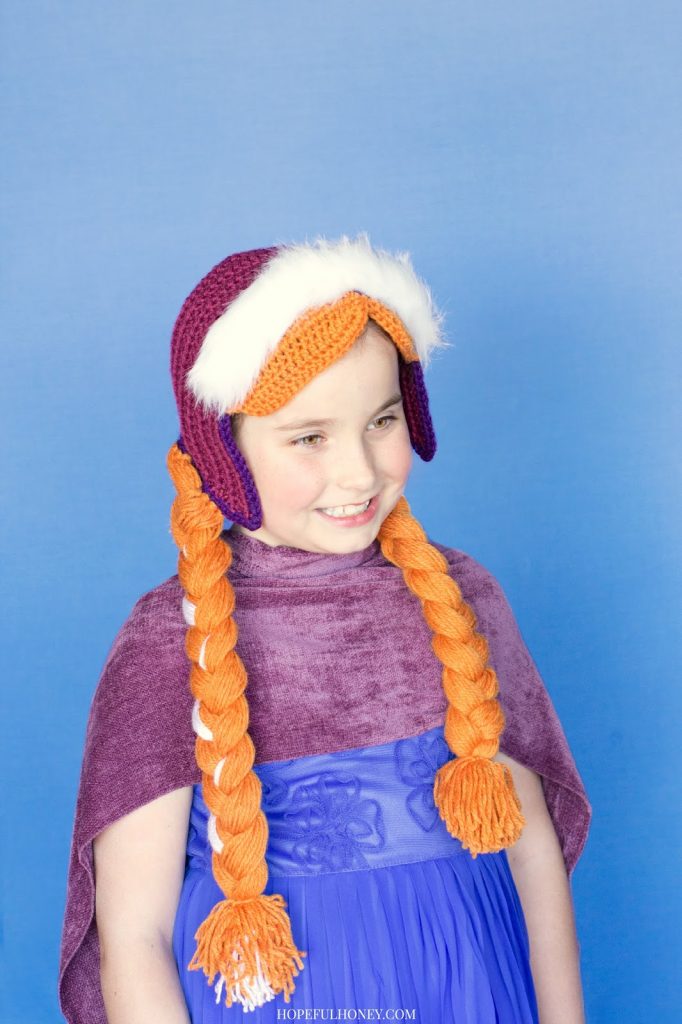
Frozen Princess Anna Inspired Hat Crochet Pattern

October 10, 2014 Category: Crochet / Hats + Headbands / Patterns

Share Share on Facebook Share on Twitter
14
What I loved most about Anna was how unique she was, and how she embraced those differences that made her special! Just like Anna, we’re all uniquely shaped snowflakes, no two are exactly alike. So never be afraid to flaunt your difference, since they make you the amazing person that you are!
 “By being yourself you put something wonderful in the world that was not there before.” 
– Edwin Elliot


What You’ll Need
5.00mm Crochet Hook 
  500yds DK (8ply) Yarn – Stylecraft Special DK

Tapestry Needle

White Faux Fur (11″ x 4″)
Sewing Needle & White Thread

Finished Size
4 – 10 Years Old
(Head Circumference 19 inches, 48cm.)


~ Note ~
{Chains at the start of a round count as the first Half Double Crochet of that round}

Round 1~ Taking your 5.00mm crochet hook and maroon DK yarn, start of by making a Slip Knot, then crochet 3 Chains. Crochet 7 Half Double Crochets into the first chain you made. Slip Stitch into the top of chain 3. You should have 8 half double crochets now.
Round 2~ Chain 2, then crochet a Half Double Crochet into the same stitch. Crochet 2 Half Double Crochets into every stitch all around. Slip Stitch into the top of chain 2. You should have 16 half double crochets now. 
Round 3~ Chain 2, then crochet a Half Double Crochet into the same stitch. *Crochet 1 Half Double Crochet into the next stitch. Then crochet 2 Half Double Crochets in the next stitch.  Repeat from the * all around. Slip Stitch into the top of chain 2. You should have 24 half double crochets now.
Round 4~ Chain 2, then crochet a Half Double Crochet into the same stitch. *Crochet 1 Half Double Crochet into the next 2 stitches. Then crochet 2 Half Double Crochets in the next stitch.  Repeat from the * all around. Slip Stitch into the top of chain 2. You should have 32 half double crochets now.
Round 5~ Chain 2, then crochet a Half Double Crochet into the same stitch. *Crochet 1 Half Double Crochet into the next 3 stitches. Then crochet 2 Half Double Crochets in the next stitch.  Repeat from the * all around. Slip Stitch into the top of chain 2. You should have 40 half double crochets now.
Round 6~ Chain 2, then crochet a Half Double Crochet into the same stitch. *Crochet 1 Half Double Crochet into the next 4 stitches. Then crochet 2 Half Double Crochets in the next stitch.  Repeat from the * all around. Slip Stitch into the top of chain 2. You should have 48 half double crochets now. 
Round 7~ Chain 2, then crochet a Half Double Crochet into the same stitch. *Crochet 1 Half Double Crochet into the next 5 stitches. Then crochet 2 Half Double Crochets in the next stitch.  Repeat from the * all around. Slip Stitch into the top of chain 2. You should have 56 half double crochets now.
Row 8~ Chain 2, then crochet a Half Double Crochet into the same stitch. *Crochet 1 Half Double Crochet into the next 6 stitches. Then crochet 2 Half Double Crochets in the next stitch.  Repeat from the * 5 times. You should have 50 half double crochets now. Turn your work. {Note: You’re going to stop crocheting in rows instead of rounds from now on.}
Row 9~ Chain 2. Crochet 1 Half Double Crochet into every stitch all across.
Row 10~ Chain 2, then crochet a Half Double Crochet into the same stitch. Crochet 1 Half Double Crochet into the next 48 stitches. Then crochet 2 Half Double Crochets in the last stitch. You should have 52 half double crochets now.
Row 11~ Chain 2. Crochet 1 Half Double Crochet into every stitch all across.

Row 12~ Chain 2, then crochet a Half Double Crochet into the same stitch. Crochet 1 Half Double Crochet into every stitch all across. Then crochet 2 Half Double Crochets in the last stitch. You should have 54 half double crochets now. 

Row 13 – 19~ Repeat rows 11 – 12 three times.
Row 20~ Chain 2. Crochet 1 Half Double Crochet into every stitch all across.
Row 21~ Chain 2, then crochet a Half Double Crochet into the same stitch. Crochet 1 Half Double Crochet into the next 13 stitches. Crochet 1 Single Crochet into the next 30 stitches. Crochet 1 Half Double Crochet into the next 13 stitches. Then crochet 2 Half Double Crochets in the last stitch. You should have 60 half double crochets now.
Row 22~ Chain 2. Crochet 1 Half Double Crochet into the next 14 stitches. Crochet 1 Single Crochet into the next 30 stitches. Crochet 1 Half Double Crochet into the next 15 stitches.
Fasten off, and weave in loose ends.

Taking your 5.00mm crochet hook and DK dark purple yarn, start of by making a Slip Knot, then attach your yarn to the back of the hat, right in the middle.
Then Half Double Crochet all along the edge of your hat. {Note: When you reach the corners, crochet 1 half double crochet in that stitch. Chain 1, then crochet 1 half double crochet into the same stitch again to create a nice corner.} Slip Stitch into the first half double crochet.
Fasten off, and weave in loose ends.
~ Hair ~

Braids
Taking your orange yarn, cut 3 strands of yarn, making sure every strand is at least 60 inches
long. Then make a simple knot into a stitch at the bottom of your hat, on the right hand side (hat facing you).
In the next stitch, knot only 2 strands of yarn. Continue alternating
between knotting 2-3 strands of yarn into the next 10 stitches. This will create that thick and luscious Disney
princess hair that we all know and love!

Now braid
the hair until it measures approx 15 inches in length. Tie a piece
of yarn around the bottom of the braid to fasten it off, before trimming
the ends of the braid.
Repeat the braid pattern on the left side of the hat (hat facing you), this time making sure to incorporate some white yarn to create Anna’s signature platinum blonde streak. 

Fringe/Bangs
Large Fringe Part
Row 1~ Taking your orange DK yarn and 5.00mm crochet hook, crochet 1 Single Crochet into the 17th stitch of your hat (Hat’s row 22). Crochet 1 Half Double Crochet into the next 2 stitches. Crochet 1 Double Crochet into the next 11 stitches. Crochet 1 Half Double Crochet into the next 3 stitches. Crochet 1 Single Crochet into the next stitch. Turn your work.
Row 2~ Chain 1. Crochet 1 Half Double Crochet into the next 3 stitches. Crochet 1 Double Crochet into the next 11 stitches. Crochet 1 Half Double Crochet into the next 3 stitches. Crochet 1 Single Crochet into the next stitch.
Row 3~ Chain 1. Crochet 1 Half Double Crochet into the next stitch. Crochet 1 Double Crochet into the next 15 stitches. Crochet 1 Half Double Crochet into the next stitch. Crochet 1 Slip Stitch into the Fasten off, and weave in loose ends.

Small Fringe Part
Row 1~ Taking your orange DK yarn and 5.00mm crochet hook, crochet 1 Single Crochet into the 37th stitch of your hat (Hat’s row 22). Crochet 1 Half Double Crochet into the next 2
stitches. Crochet 1 Double Crochet into the next 5 stitches. Crochet 1 Half Double Crochet into the next 2 stitches. Crochet 1 Slip Stitch
into the next stitch. Turn your work.
Row 2~ Chain 1. Crochet 1 Half Double Crochet into the next 2 stitches. Crochet 1 Double Crochet into the next 5 stitches. Crochet 1 Half Double Crochet into the next 2 stitches. Crochet 1 Slip Stitch into the next stitch.
Fasten off, and weave in loose ends. 

Now taking your 5.00mm crochet hook and burnt orange yarn, Crochet 1 Slip Stitch into the 15th stitch of your hat (hat’s row 22). Crochet 1 Single Crochet into the next stitch. Crochet 1 Half Double Crochet all around both fringe parts. {Note: This creates a nice smooth border, as well as join the two parts of the fringe together.} Crochet 1 Single Crochet into the 48th stitch of the hat. Crochet 1 Slip Stitch into the next stitch.
Fasten off, and weave in loose ends.

Fur
Now taking your piece of faux fur, fold it in 3, so that the piece measures approx 11 inches x 1.5 inches. Then taking your sewing needle and white thread, sew the faux fur across the top of the hat.


Hope you all enjoyed this Disney inspired pattern!

If you did crochet this, please post a photo of your creation onto my Facebook Page.
I’d love to see it!
Have a lovely day crocheting,

SaveSave

  • Glencoe Tartan Poncho Crochet Pattern
  • Florence Backpack Crochet Pattern
  • How To: Crochet The Heart Stitch - Easy Tutorial

Reader Interactions

Comments

    Leave a Note Cancel reply

  1. Anonymous says

    October 11, 2014 at 5:59 pm

    Cute!

    Reply
  2. mina fowler says

    October 28, 2014 at 12:38 am

    love it

    Reply
  3. Anonymous says

    November 26, 2014 at 10:28 am

    Can you explain rows 13-19. That is hard to understand. The stitches don't add up…or rows

    Reply
    • Olivia Kent says

      November 26, 2014 at 1:51 pm

      Hello,

      You just alternate between crocheting rows 11 and 12 for rows 13-19. So for row 19, repeat row 11.
      Hope this helps!

      Olivia

      Reply
  4. Marz says

    November 27, 2014 at 3:56 am

    What brand of Yarns did you use with these patterns? It's just hard to find the right colors. Thanks

    Reply
  5. Ami Jeff says

    December 11, 2014 at 1:23 am

    Could you please clarify row 8? My stitch count is not adding up.

    Reply
  6. Shawne Freeman says

    December 24, 2014 at 5:02 am

    Olivia,
    Thank you so much for your creativity and generosity in offering your Anna and Elsa hats! I have a special 5 year old who is going to love them so much!
    Shawne 🙂

    Reply
  7. Anonymous says

    February 17, 2015 at 10:49 pm

    Can you put a picture of the back please?

    Reply
  8. alioopszz says

    October 23, 2015 at 8:09 pm

    I am having a problem understanding how you go from 56 stitches on row 7 to having 50 stitches on row 8 (while increasing every 6 stitches). Others don't seem to have trouble with this so I must be doing something wrong. Any help would be greatly appreciated.

    Reply
  9. Lori George says

    November 23, 2015 at 3:20 am

    having same problem help

    Reply
  10. Bethany S. says

    November 25, 2015 at 11:52 am

    Need a picture of the back, or at the very least where you stop crocheting in rounds and start with rows.

    Reply
  11. jane says

    May 29, 2016 at 12:23 pm

    Very lovely hat! Thank you for the pattern.

    Reply
  12. ankita says

    December 14, 2017 at 9:10 pm

    its really nice i like it

    Reply
  13. parul says

    December 14, 2017 at 9:34 pm

    its great really i like it

    Reply

Follow Along on Instagram @HopefulHoney

Copyright © Hopeful Honey Olivia Kent 2025
  • Policies
  • Contact
Follow Hopeful Honey on Facebook! Follow Hopeful Honey on Twitter! Follow Hopeful Honey on Pinterest! Follow Hopeful Honey on Instagram! Follow Hopeful Honey on YouTube!
Designed by Melissa Rose Design Developed by Once Coupled