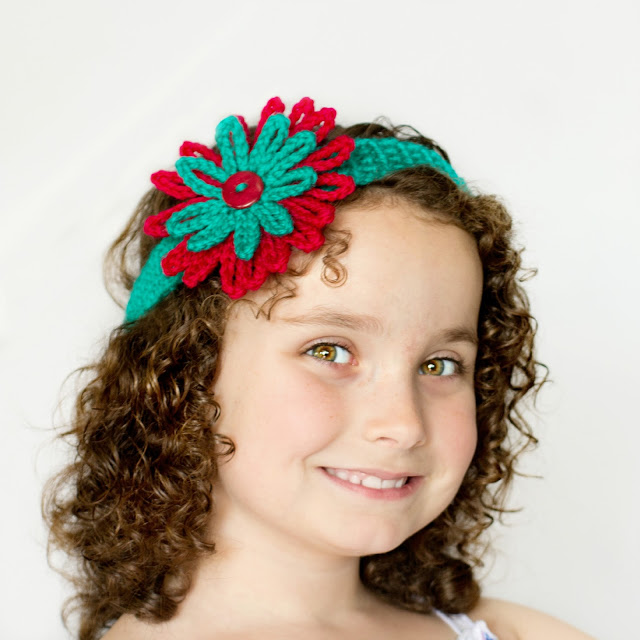
Season Of Giving ~ Crochet Headband & Flower Crochet Pattern
I can’t imagine how much God must have loved us to give us His most
precious possession, His son!
precious possession, His son!
At the moment it’s the special season for
giving.
So please go out and give your love and friendship too the ones that need it most!
Hope all of you have a wonderful, happy and blessed Christmas!
giving.
So please go out and give your love and friendship too the ones that need it most!
Hope all of you have a wonderful, happy and blessed Christmas!
Hopefully this pattern will inspire you to create something beautiful for a loved one 🙂
What You’ll Need:
H or 5.00 Crochet Hook
DK or 8ply Yarn
Scissors
Tapestry Needle
7×7 Inch Foam Board
1×1 Inch Button
Pins
Iron or Spray Bottle
Colours:
These are the colours I used.
{You can use different colours, and in any order at all}
Colour 1 ~Dark Spring Green
Colour 2 ~ Scarlet
Finished Size:
~ ~ ~ Pattern ~ ~ ~
Band:
Start of by using colour 1 to make a Slip Knot. Chain 8, then push your crochet hook back through the sixth stitch and make a Single Crochet.
Continue to make single crochets till you get to the end of the row,
then crochet 2 chain stitches and go back into the second last crochet
stitch you did. When crocheting into the stitches, go through the front loop only, this will create a ribbed band.
then crochet 2 chain stitches and go back into the second last crochet
stitch you did. When crocheting into the stitches, go through the front loop only, this will create a ribbed band.
Continue making single crochets, row after row. Now it’s time to measure your head circumference or you can check out the standard head sizes HERE! You’ll need to make your band 1.5 inches (4 cm) shorter than your measurement so that your headband will fit snuggly and not slip off your head. Mine measured 20 inches (51 cm)
When you’ve completed all the rows, connect the two ends of the band together to create a circle and Slip Stitch them together.
Big Flower:
After you’ve finished both flowers, you’ll need to Block them. Start by taking a cup or round bowl and mark a circle on your foam board. Taking your pins, pin down your flowers. Now to block them you can either hover your iron over them and steam them, or spray them with a spray bottle. Steaming usually dries quicker. I found this video very helpful! ~ http://vimeo.com/23758028
Big Flower:
Start of by using colour 2 to make a slip knot. Chain up 2, then crochet 8 single crochets into loop. Join with a slip stitch to top of chain 2.
Chain up 2, crochet 2 single crochets into every stitch all around. Join with a slip stitch to top of chain 2.
Chain up 14 slip stitch into next stitch.* Repeat from the * mark all around. After
last slip stitch, fasten off and weave in loose ends.
last slip stitch, fasten off and weave in loose ends.
Small Flower:
Start of by using colour 1 to make a slip knot. Chain up 2, then crochet 8 single crochets into loop. Join with a slip stitch to top of chain 2. *Chain up 12, slip stitch into next stitch.* Repeat from the * mark all around. After last slip stitch, fasten off and weave in loose ends.
After you’ve finished both flowers, you’ll need to Block them. Start by taking a cup or round bowl and mark a circle on your foam board. Taking your pins, pin down your flowers. Now to block them you can either hover your iron over them and steam them, or spray them with a spray bottle. Steaming usually dries quicker. I found this video very helpful! ~ http://vimeo.com/23758028
After they’ve dried, unpin your flowers, and select your button. Place your band at the bottom, your large flower on top of that, and your small flower and button on top of that. Sew everything together with colour 1 yarn. Fasten off, and weave in loose ends. Sew it right on top of the seam so it doesn’t show.
I hope you all enjoyed this Christmasy tutorial!
If you did crochet this, please post a photo of your creation onto my Facebook Page, I’d love to see it! It always brightens my day when one of your post something you made from my blog 🙂
Hope you all enjoyed this pattern!
Have a lovely day crocheting and crafting everyone!
Have a lovely day crocheting and crafting everyone!


Thank you very much for the pattern, I love your blog!
My granddaughter is battleing cancer (neuroblastoma) she is 2. (hurts our hearts ) I have been looking for a pattern for a while, she loves to wear the bands I can't wait to make this for her. Thanks
I am so sorry you and you're family are busy going through such a tough time! I've had quite a few health issues myself, and I've met sooo many beautiful children suffering from some form of cancer. It's a cause really close to my heart, so in my spare time I crochet beanies as a volunteer for the paediatric cancer patients 🙂
I hope she loves the headband! You and your family are in my prayers!
Olivia Xx
thankyou i think i will make one for myself its lovely and i love wearing headbands
pippx happy xmas love your blogg
I love this pattern! I wish all crochet patterns were this easy to read and follow…. I have already made two (one for myself and one for a friend) and I can't wait to make more! I especially love making the flowers. 🙂 I also decided not to block them after I saw how cute it looks when the pettals are all loopy. Thank you SO MUCH for sharing this pattern. It makes me love crocheting that much more 🙂 Happy new year!
Aww I'm so glad you had so much fun making the headbands!
Happy new year to you too!
Love this flower pattern its so cute!
I am somewhat new to crochet . Will you please rearrange the instructions for making the flowers on this at the beginning of pattern. Chain up 2 then what?
I plain on making this for my 14 year old for Christmas pics. but I will be using red and white with a green button.
Thank you Olivia for your generosity ! I LOVE all of your creations.
Thank you Olivia for your generosity ! I LOVE all of your creations.
having problems understanding how to make the flower for this headband. Your wording is very different from most written patterns I'm used to. Oh, I see now, you need to put a comma between chain up 14(comma), slip stitch into next stitch. lol, I was putting 14 slip stitches into one stitch because you left out the comma!
having problems understanding how to make the flower for this headband. Your wording is very different from most written patterns I'm used to. Oh, I see now, you need to put a comma between chain up 14(comma), slip stitch into next stitch. lol, I was putting 14 slip stitches into one stitch because you left out the comma!
The blog or and best that is extremely useful to keep I can share the ideas of the future as this is really what I was looking for, I am very comfortable and pleased to come here. Thank you very much.
animal jam | five nights at freddy's | hotmail login
I was very impressed by this post, this site has always been pleasant news. Thank you very much for such an interesting post. Keep working, great job! In my free time, I like play game: mutilateadoll2game.com. What about you?
I like your all post. You have done really good work. Thank you for the information you provide, it helped me a lot. I hope to have many more entries or so from you.
Very interesting blog.
b612az.com
its really nice i like it
its great really i like it