Field Mouse Baby Booties Crochet Pattern
Materials
Yarn (DK) – Patons Cotton Blend
Scissors
4 Black Buttons (1cm x 1cm)
Pattern
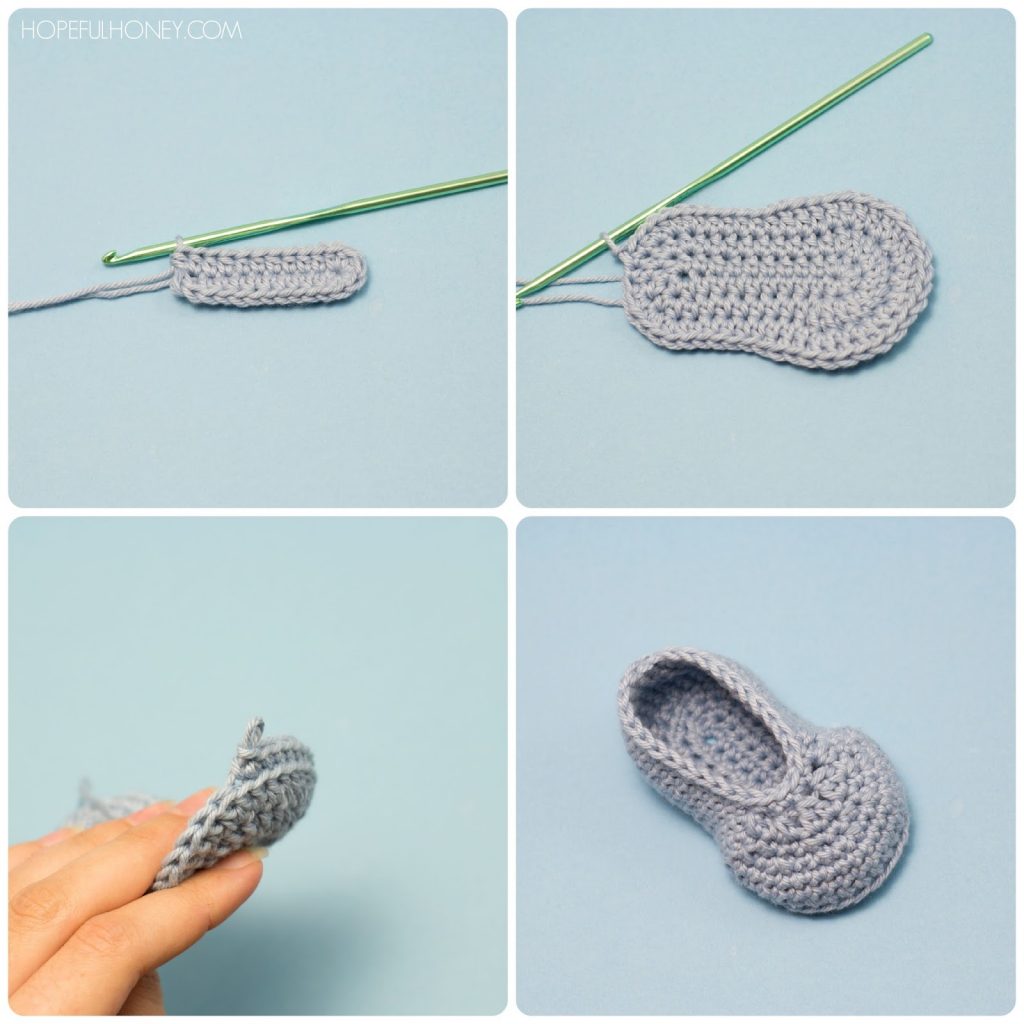
Taking your 3.50mm crochet hook and DK yarn (cloud colour), start of by making a Slip Knot, then crochet 11 (13) Chains.
Rnd 1–
Crochet 2 Half Double Crochets into the second chain from your hook. Crochet 1 Half Double Crochet into the next 8 (10) chains. Crochet 6 Half Double Crochets into the last chain. {Note: You are now going to be working on the opposite side of foundation chain.} Crochet 1 Half Double Crochet into the next 8 (10) stitches. Crochet 2 Half Double Crochets into the last stitch. You should
have 26 (30) stitches now. Do not slip stitch into the first half double crochet of this round.
Rnd 2– Start crocheting in the first stitch from the previous round. Crochet 2 Half Double Crochets in the next 2 stitches. Crochet 1 Half Double Crochet into the next 8 (10) stitches. Crochet 2 Double Crochets in the next 6 stitches. Crochet 1 Half Double Crochet into the next 8 (10) stitches. Crochet 2 Half Double Crochets in the next 2 stitches. You should have 36 (40) stitches now. Do not slip stitch into the first half double crochet of this round.
Rnd 3– Start crocheting in the first stitch from the previous round. Crochet 1 Half Double Crochet in the next 2 stitches. Crochet 2 Half Double Crochets in the next 3 stitches. Crochet 1 Half Double Crochet in the next 5 (7) stitches. Crochet 1 Double Crochet in the next 3 stitches. *Crochet 2 Double Crochets in the next stitch. Crochet 1 Double Crochet in the next stitch. Repeat from the * 6 times. Crochet 1 Double Crochet in the next 3 stitches. Crochet 1 Half Double Crochet in the next 5 (7) stitches. Crochet 2 Half Double Crochets in the next 2 stitches. Crochet 1 Half Double Crochet and 1 Single Crochet in the next stitch. Slip Stitch into the first stitch of this round. You should have 48 (52)
stitches now.
Fasten off, and weave in loose ends.
Top Of Shoe
Rnd 1– Attach your yarn (cloud colour) right in the middle of the
heel. Chain 1, crochet 1 Single Crochet into the same stitch, but only through the back loop. {Note: Continue crocheting the stitches in this round, only in the back loop.} Crochet 1 Single Crochet in the next 47 (51) stitches. Do not slip stitch into the first single crochet of this round.
Rnd 7– Start crocheting in the first stitch from the
previous round. Crochet 1 Single Crochet in every stitch all around. Slip Stitch into the first stitch of this round.
Fasten off, and weave in loose ends.
Repeat pattern to make a pair.
Ears
Inner Ear
Rnd 1- Taking your 3.50mm crochet hook and DK pink yarn, start of by making a Slip Knot, then crochet 2 Chains. Crochet 6 Single Crochets into the first chain you made. Do not slip stitch into the first single crochet of this round. You should have 6 stitches now.
Rnd 2– Start crocheting in the first stitch from the previous round. Crochet 2 Single Crochets in the first stitch. Crochet 2 Single Crochets into every stitch all
around. Slip Stitch into the first stitch. You should have 12 stitches now.
Fasten off, and weave in loose ends.
Create 4 Inner Ears.
Outer Ear
Rnd 2– Start crocheting in the first stitch from the previous round. Crochet 2 Single Crochets in the first stitch. Crochet 2 Single Crochets into every stitch all
around. Do not slip stitch into the first single crochet of this round. You should have 12 stitches now.
Rnd 4– Start crocheting in the first stitch from the previous round. Crochet 1 Single Crochet in every stitch all around.
Slip Stitch into the first stitch.
Fasten off, and weave in loose ends.
Fasten off, and weave in loose ends.
Create 4 Outer Ears.
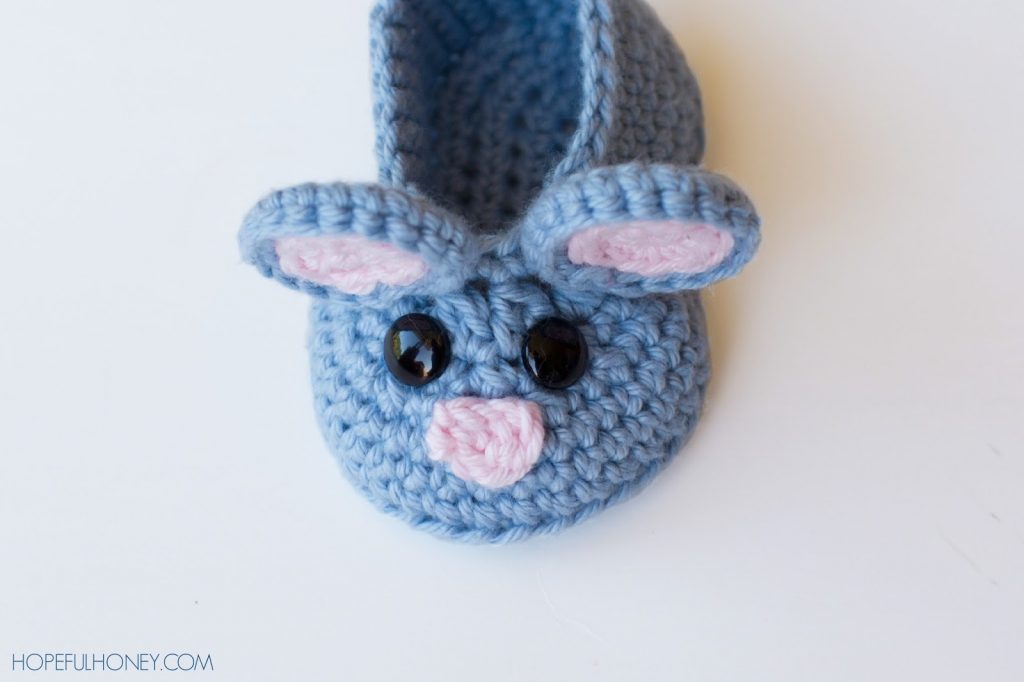
Taking your tapestry needle, sew 2 outer ears onto the front of each bootie, towards the top. Then sew the 1 inner ear
inside each of the outer ears.
Nose
Taking your 3.50mm crochet hook and DK yarn (pink), start of by making a Slip Knot, then crochet 5 Chains. Crochet 1 Double Crochet in the third chain from your hook. Crochet 1 Half Double Crochet in the next stitch. Crochet 1 Single Crochet in the last stitch.
Fasten off, and weave in loose ends.
Create 2 Noses.
Taking your tapestry needle, sew1 nose onto the front of each bootie right in the middle.
Eyes and Tail
Now, sew 2 black buttons onto the front of each bootie, right below the ears.
To add a tail to the bootie, cut 3 strands of yarn (cloud) making sure each strand measures 10″ in length. Taking your crochet hook, pull all 3 strands around 1 of the stitches at the back of the bootie. You should now have 6 strands. Braid those 6 strands together, till the braid measures 1 inch, then create a knot, and trim the ends.
Repeat the steps above to add a tail to your other bootie.


Olivia, thank you very much for sharing your pattern, it takes precious time to create and make. These little blue mice are very lovely, I am going to make them for a friend just about to have a baby. Thank you again. These booties are so pretty.
I must make these.Thank you for sharing.
These are just adorable! I am pinning and sharing.
Alexandra
EyeLoveKnots.blogspot.com
This is so cute.Thank you.
These are just soooo adorable! Thank you for sharing your design skills!
wonderfull
You have inspired us to make a baby gift for our friends baby shower. We are going to make four character booties from your website and give them with Beatrix Potter story books. We are making Jemima Puddle-Duck (duck), Jeremy Fisher (frog), Mrs. Tuttlemouse (these adorable mouse booties) and finally Pig Robinson (pig). We can't wait to show you how it turns out!
This is so sweet and I want to thank you for sharing your talent with others.
I am so happy that I found your site and I will be back again.
Thank you for these sweet mice. Pinned and shared
Thank you for shering the pattern! These are so cute 🙂
Greetings from Sweden
Could you give me a little advice about how I might be able to make these for an older child? She, like myself, loves mice and would love it if I made these for her! She wears a size 2 and is 7 y.o. I appreciate any help you can give me! Thank you!
Are these crochet terms American or British?
These booties are so pretty. Thank you for sharing.
Love this mouse baby booties. I made them thinking of future grandkids but would send them to babys in tent cities in the south of Puerto Rico whose familieslost everything due to more than a thousand earthquaques singe december 28.
So adorable. Can’t wait to make some for my 6 little Great Grandkids. They will love them.
Absolutely beautiful! I cant wait to try this out! Well done and thanks for sharing the pattern 👍🏾