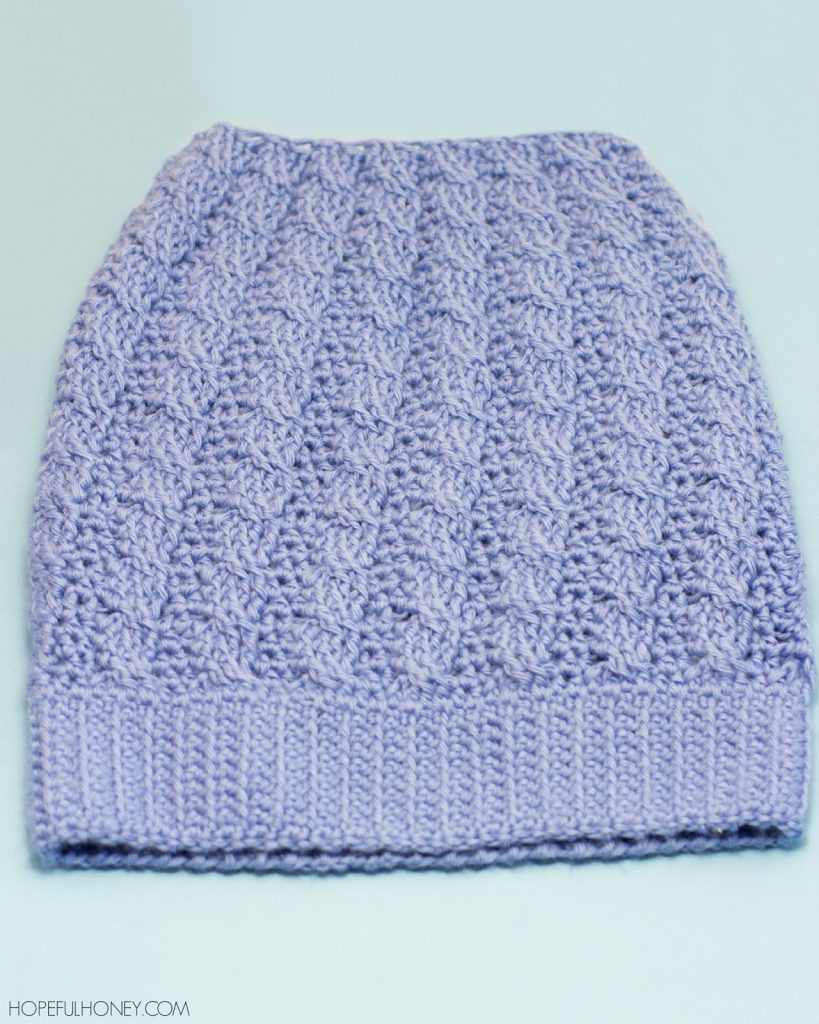
Cabled Slouchy Beanie Crochet Pattern
What You’ll Need
Finished Size
Band
Taking your 5.00mm crochet hook and DK yarn, start of by making a Slip Knot, then crochet 11 Chains.
Row 1~ Chain 1. Crochet 1 Single Crochet into the third chain from your hook.
Then crochet 1 Single Crochet into the next 9 chains. You should
have 11 single crochets now.
Row 2 – 97~ Chain 1. Crochet 1 Single Crochet into every stitch across, but only through the front loop. {Note: You can either add or take away a couple of extra rows depending on your head’s circumference.}
Now sew both ends of your strip together to create a band.
Fasten off, and weave in loose ends.
Beanie
Start of by attaching your yarn to the first stitch along the length of your beanie’s band.
Round 1~ Chain 2. Crochet 1 Half Double Crochet into the same stitch. Crochet 95 Half Double Crochets all around the band, making sure to evenly space out your stitches. {Note: If you created a larger or smaller band, add or take away sets of 6 half double crochets.} Slip Stitch into the first half double crochet of the round.
Round 2~ Chain 2. Crochet 1 Half Double Crochet into the same stitch. Crochet 1 Half Double Crochet into the next stitch. *Crochet 1 Cable Stitch into the next 4 stitches. {Note: I have an easy video tutorial below on how to crochet the cable stitch below. Since this is a 4 stitch cable, and not and 8 stitch cable, use Front Post Triple Crochets instead of Front Post Double Triple Crochets. You’ll also want to skip only 2 stitches, instead of 4 stitches.} Crochet 1 Half Double Crochet into the next 2 stitches. Repeat from the * all around. Slip Stitch into the first half double crochet of this round. You should have 16 cable stitches now, with 2 half double crochets between each cable.
Slip Stitch into the first half double crochet of this round.
Round 4~ Chain 2. Crochet 1 Half Double Crochet into the same stitch. Crochet 1 Half Double Crochet into the next stitch. *Crochet 1 Front Post Double Crochet around the next 4 stitches. Crochet 1 Half Double Crochet into the next 2 stitches.
Repeat from the * all around. Slip Stitch into the first half double crochet of this round.
Round 5~ Chain 2. Crochet 1 Half Double Crochet into the same stitch. Crochet 1 Half Double Crochet into the next stitch. Crochet 1 Cable Stitch into the next 4 stitches. *Skip 1 stitch. Crochet 1 Half Double Crochet into the next stitch.
Crochet 1 Half Double Crochet into the next stitch. Crochet 1 Cable Stitch into the same stitch and across the next 3 stitches. Repeat from the * all around. Slip Stitch into the first half double crochet of this round.
Round 6~ Repeat round 4.
Round 7 – 9~ Repeat round 3. Then repeat round 2. Then repeat round 3 again.
Round 10 – 12~ Repeat round 4. Then repeat round 5. Then repeat round 4 again.
Round 13 – 15~ Repeat round 3. Then repeat round 2. Then repeat round 3 again.
Round 16 – 18~ Repeat round 4. Then repeat round 5. Then repeat round 4 again.
Round 19 – 21~ Repeat round 3. Then repeat round 2. Then repeat round 3 again.
Round 22 – 24~ Repeat round 4. Then repeat round 5. Then repeat round 4 again.
Round 25~ Repeat round 3.
Round 26~ Chain 2. *Crochet 1 Half Double Crochet Decrease. Crochet 1 Cable Stitch into the next 4 stitches. Repeat from the * all around. Slip Stitch into the first half double crochet of this round. You should have 80 stitches now.
Round 27~ Chain 2. Crochet 1 Half Double Crochet into the same stitch. *Crochet 1 Front Post Double Crochet around the next 4 stitches. Crochet 1 Half Double Crochet into the next stitch.
Repeat from the * all around. Slip Stitch into the first half double crochet of this round.
Round 28~ Chain 2. Crochet 1 Half Double Crochet into the same stitch. Crochet 1 Front Post Double Crochet around the next 4 stitches. *Skip 1 stitch. Crochet 1 Half Double Crochet into the next stitch. Crochet 1 Front Post Double Crochet around the same stitch. Crochet 1 Front Post Double Crochet around the next 3 stitches. Repeat from the * all around. Slip Stitch into the first half double crochet of this round.
Round 29~ Chain 2. Crochet 1 Half Double Crochet into the same stitch. *Crochet 1 Cable Stitch into the next 4 stitches. Crochet 1 Half Double Crochet into the next stitch. Repeat from the * all around. Slip Stitch into the first half double crochet of this round.
Round 30~ Repeat round 28.
Round 31~ Repeat round 27.
Round 32~ Chain 2. Crochet 1 Half Double Crochet into the same stitch. Crochet 1 Cable Stitch into the next 4 stitches. *Skip 1 stitch. Crochet 1 Half Double Crochet into the next stitch. Crochet 1 Cable Stitch into the same stitch and across the next 3 stitches. Repeat from the * all around. Slip Stitch into the first half double crochet of this round.
Round 33~ Chain 2. *Crochet 1 Front Post Double Crochet around the next 4 stitches. Skip 1 stitch. Repeat from the * all around. Slip Stitch into the top of chain 2. You should have 64 stitches now.
Round 34~ Chain 2. Crochet Front Post Double Crochet Decreases all around. You should have 32 stitches now.
To seam up the top of your beanie, take your tapestry needle and some yarn. Then thread the yarn all along the last round and pull it tightly to gather it all together. Then sew the small hole closed.
Fasten off, and weave in loose ends.
Hope you all enjoyed this pattern!


Wow, it's so pretty Olivia! Nice job!
I really Love this hat! Thanks for all you do!
I'm confused, is it one cable stitch in the next 4 or should it be front post stitch?
It is 1 cable stitch, but since a cable consists of either 4, 6 or 8 stitches, you need to crochet your cable stitch across 4 stitches.
Hope this helps!
That's in round 5
What was the length of your yarn? should 300yd be enough?
Thanks for the first time with your easy tutorial and determination. I did the crochet cable stitch. Yes I did it.
I love it!
its really nice i like it
its great really i like it
Is there a difference between round 3 and 5?