Santa Claus Hat Crochet Pattern
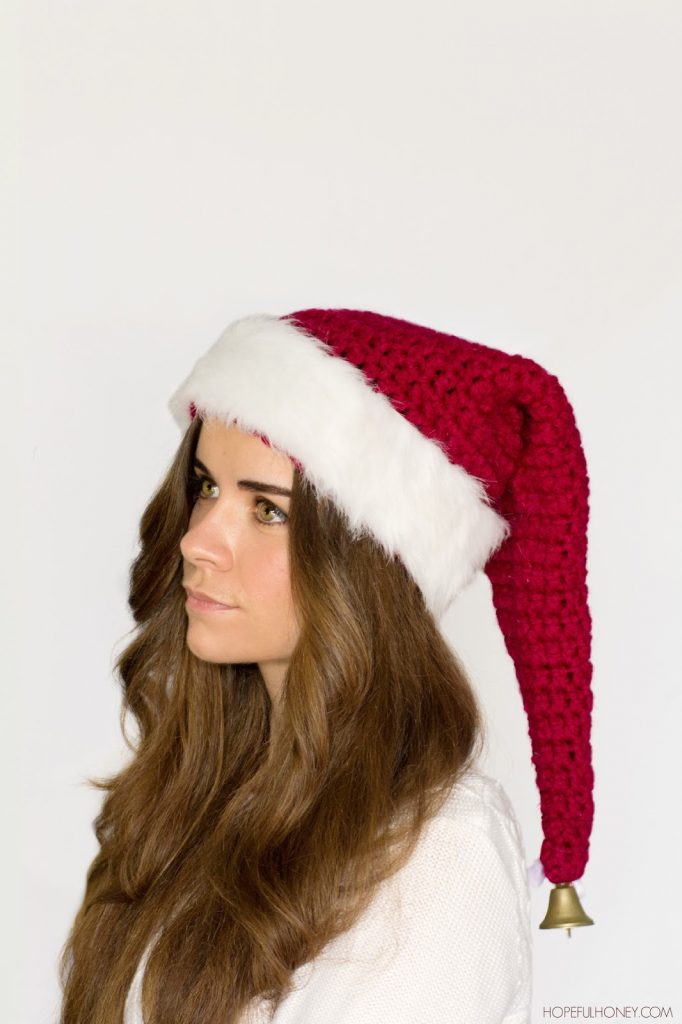
With Christmas fast approaching, there couldn’t have been a better time for me to create this Santa hat!
When I started working on it, I aimed to achieve a cozy yet luxurious appearance, and I think I got pretty close!.. So this year while opening and giving presents, I know exactly what hat I’ll be wearing.
Is wearing a Santa hat or antlers one of your Christmas traditions too?
What You’ll Need
8.00mm Crochet Hook
200g Bulky Yarn {12ply} – I used Lincraft Veronica
Scissors
Tapestry/Wool Needle
White Faux Fur {28 inches x 3 inches}
Bell {1.5 inches x 1.5 inches}
Piece of White Ribbon {10 inches in length}
White Faux Fur {28 inches x 3 inches}
Bell {1.5 inches x 1.5 inches}
Piece of White Ribbon {10 inches in length}
Finished Size
Fits 13 Years & Up
Round 1~ Taking your 8.00mm crochet hook and bulky yarn, start of by making a Slip Knot, then crochet 3 Chains. Crochet 5
Double Crochets into the first chain you made. Slip Stitch into the top of chain 3. You should have 6 double crochets now.
Round 2~ Chain 2. Crochet 1 Double Crochet into every stitch all around. Slip Stitch into the top of chain 2.
Round 3~ Chain 2. Crochet 1
Double Crochet into the next stitch. Then crochet 2
Double Crochets in the next stitch. Crochet 1
Double Crochet into the next 2 stitches. Then crochet 2
Double Crochets in the next stitch. Slip Stitch into the top of chain 2. You should have 8 double crochets now.
Double Crochet into the next stitch. Then crochet 2
Double Crochets in the next stitch. Crochet 1
Double Crochet into the next 2 stitches. Then crochet 2
Double Crochets in the next stitch. Slip Stitch into the top of chain 2. You should have 8 double crochets now.
Round 4~ Repeat round 2.
Round 5~ Chain 2. *Then crochet 2
Double Crochets in the next stitch. Crochet 1
Double Crochet into the next 2 stitches. Repeat from the * all around. Slip Stitch into the top of chain 2. You should have 11 double crochets now.
Double Crochets in the next stitch. Crochet 1
Double Crochet into the next 2 stitches. Repeat from the * all around. Slip Stitch into the top of chain 2. You should have 11 double crochets now.
Round 6~ Repeat round 2.
Round 7~ Chain 2. Crochet 1
Double Crochet into the next stitch. *Then crochet 2
Double Crochets in the next stitch. Crochet 1
Double Crochet into the next 2 stitches. Repeat from the * all around. Slip Stitch into the top of chain 2. You should have 14 double crochets now.
Double Crochet into the next stitch. *Then crochet 2
Double Crochets in the next stitch. Crochet 1
Double Crochet into the next 2 stitches. Repeat from the * all around. Slip Stitch into the top of chain 2. You should have 14 double crochets now.
Round 8 – 9~ Repeat round 2.
Round 10~ Chain
2. Crochet 1
Double Crochet into the next stitch. *Then crochet 2
Double Crochets in the next stitch. Crochet 1
Double Crochet into the
next 2 stitches. Repeat from the * all around. Slip Stitch into the top of chain 2. You should have 18 double crochets now.
2. Crochet 1
Double Crochet into the next stitch. *Then crochet 2
Double Crochets in the next stitch. Crochet 1
Double Crochet into the
next 2 stitches. Repeat from the * all around. Slip Stitch into the top of chain 2. You should have 18 double crochets now.
Round 11 – 12~ Repeat round 2.
Round 13~ Chain
2. Crochet 1
Double Crochet into the next stitch. *Then crochet 2
Double Crochets in the next stitch. Crochet 1
Double Crochet into the
next 2 stitches. Repeat from the * all around. Slip Stitch into the top of chain 2. You should have 24 double crochets now.
2. Crochet 1
Double Crochet into the next stitch. *Then crochet 2
Double Crochets in the next stitch. Crochet 1
Double Crochet into the
next 2 stitches. Repeat from the * all around. Slip Stitch into the top of chain 2. You should have 24 double crochets now.
Round 14 – 15~ Repeat round 2.
Round 16~ Chain
2. Crochet 1
Double Crochet into the next stitch. *Then crochet 2
Double Crochets in the next stitch. Crochet 1
Double Crochet into the
next 2 stitches. Repeat from the * all around. Slip Stitch into the top of chain 2. You should have 32 double crochets now.
2. Crochet 1
Double Crochet into the next stitch. *Then crochet 2
Double Crochets in the next stitch. Crochet 1
Double Crochet into the
next 2 stitches. Repeat from the * all around. Slip Stitch into the top of chain 2. You should have 32 double crochets now.
Round 17 – 18~ Repeat round 2.
Round 19~ Chain
2. Crochet 1 Double Crochet into the next stitch. *Then crochet 2
Double Crochets in the next stitch. Crochet 1
Double Crochet into the
next 2 stitches. Repeat from the * all around. Slip Stitch into the top of chain 2. You should have 42 double crochets now.
2. Crochet 1 Double Crochet into the next stitch. *Then crochet 2
Double Crochets in the next stitch. Crochet 1
Double Crochet into the
next 2 stitches. Repeat from the * all around. Slip Stitch into the top of chain 2. You should have 42 double crochets now.
Round 20 – 29~ Repeat round 2.
Fasten off, and weave in loose ends.
Now taking your piece of ribbon, tie your bell to the end of your hat. With your leftover ribbon, create a small bow.
Taking some white thread, sew your faux fur all around the bottom of your hat to create a fur trim.
Hope you all enjoyed this Christmas-y pattern!
If you did crochet this, please post a photo of your creation onto my Facebook Page.
I’d love to see it!
Have a lovely day crocheting,
“This post was originally published at Skip To My Lou on 25/11/2014.”


love your work… it inspires me to try different patterns:) Happy Holidays
its really nice i like it
its great really i like it
As it seems to no longer exist you should take the link from your side and from ravelry too!